Pages

Wednesday, January 28, 2009

Book Review – A Digital Photographer’s Guide to Model Releases

This weekend I was out shooting in cold weather. Very cold weather at –20c (-4F) and luckily, on one-day, bright sunny skies and no wind. I did bring my beaver tail snowshoes but the snow depth was only about 6-8” in most places and I decided to just hike around in my big boots. I was hiking up to a rocky knoll that has a 40km (25m) view of the surrounding area. I was hoping something would show up. While I do stay in a nice warm cabin when not outside I don’t quite have the amenities (computer) to really see if I got any decent photos.

That is why I decided to do a review of a book that was related to photography during the quiet times when I was by the fire.

But first, a photograph since this is a photography Blog

disposable film camera and negative scanned

This is a 21 foot stitch-and-glue method sea kayak (Tred Avon) I built then my son and I are off the coast of Maine on the Maine Island Trail in the early 90s.

In hindsight, since I didn’t plan it that way (maybe subconsciously) but the paddles, right rock face and the background islands all create visual directions to focal point which is the positioned kayak.


A Digital Photographer’s Guide to Model Releases


While in Chapters bookstore one time for my regular routine of “grab a hot drink at Star
Bucks and a magazine or photography book” and sit at Chapters for a good read, I came across this book and decided to buy it.

As yet I haven’t had experience with model releases or other photography related licensing requirements but I do have almost 20 years experience with government contracting and therefore by extension contract law and particularly with rights and liability needs.

The book is written by Dan Heller, a renowned photographer with many years experience who has a blog Dan Heller.

Early on, Dan does a good job of explaining that law is not a mathematical formula applied to any situation but rather legislation and legal ruling may have overlapping coverage under model releases and therefore competing needs.

He actually explains this way better than I can.

I will briefly describe the 7 Chapters in the book.

Part 1: So everybody’s doing it. So what is right?
This chapter provides a basic overview of the model releases within the many photography usages as well as people’s misconceptions about the facts.

Part 2: What’s a model release?
This section describes, in layman’s terms, the legal structure (parts) of a model release and most importantly ties in the three views that impact a model release (Subject, Photographer, Publisher).
It addresses who is responsible for having and obtaining these model releases and it also discusses litigation that may arise from the different views.
Also how to think about the subject when running a business.

Part 3: Understanding Use
This section goes into a good amount of detail on defining what photo publishing means and an understanding of the various ways photos are used, such as editorial, fine-art and art work, commercial, satire and how the photographer acquired the image. Also, self-publishing and self-promotion.


Part 4: Analysing the Need for Model Release
This section helps you walk through the process of deciding factors and needs for a model release as well as analysing the risks for possible usages of a photo. It examines different obligations that arise from how the photographer obtained images and then ultimately conveyed related information to the publisher.


Part 5: Dissecting a Model Release
This section provides guidance on who owns photo (work-for-hire, commercial shoot, freelance) - your own model release and pitfalls with boilerplate templates. The creation of a simple release.


Part 6: Dealing with Photos as Properties
This section describes the legal need for, and many usages of, model releases for other than persons, such as buildings, trademarks. It provides guidance on how these objects can be used within photos and what situations require a model release for property.


Part 7: The Business of Licensing
This section helps you decide in your business life on when is feasible to obtain model releases


Summary

Because of the nature of this subject, and as Dan clearly articulates, it is not practical to give little tips on model releases here. There is a whole set of context that surrounds the need for a release that it is important to understand the guiding principles before you start interpreting an idea into your different situation.

The book as a whole is well written in every day language and provides many examples from the every day needs of photographers. It provides an adequate understanding of this very complex subject.

It won’t negate the need for a lawyer in complex or risky circumstances, but will help you understand better when such a subject matter expert is needed. It won’t make you an expert on the subject, as this whole field is just too complex.

As a photographer, Dan has included very many photos of every day people out and about across the whole globe. Many of the chapters have references to court cases that help to demonstrate issues. Dan brings a lot of practical experience to the many nuances of writing, obtaining, and using model releases.


Recommendation

Price $36 CDN, $33 US
272 pages

I would guess that about ½ is wording and the other are images with little sticky notes for emphasis of key thoughts.

If you plan to submit to stock images site or undertake commercial and even wedding photography then I would recommend this book as providing a good and well-rounded guide on the subject of Model Releases.

I enjoyed this book and will keep it as a reference on this subject. There were even a few paragraphs that I used the highlighter on.


Niels Henriksen

Disclosure:
I have not received any monies or gifts from the author or any business related to publishing or distribution of the book.

Sunday, January 18, 2009

Masking a Yellow & Blue Flower

Where I live, a deep cold sets in every now and then (Ottawa the coldest capitol in the world). The one good point about –33 degrees is that it doesn’t matter whether it’s in C or F. It’s the same and it’s very cold.

This week I thought I would take a review of some of my sunnier and warmer images and I had one subject in mind. While on route through the hard drive folders, I came across an image that for some surprising reason has always peaked my interest but as yet never experienced any playful adjustments. What better is there to do on such a cold day.


Part of the interest with this image was that I thought I could create more colour contrast between the yellower parts of the flowers and the yellow-green and darker lower parts of the flowers. Another appeal was from my previous article Winter Fog – Great Photography Weather , which looked at creating masks. Sometimes it’s just fun to play.

I thought with just the right mask I could add more blue and cooler tones to the under world and with the very yellow flower heads I could make them warmer (orange) and increase the contrast of the softer petals.


For the blue changes I duplicated the layer and used LAB mode to adjust both the blue and green channels and then converted back to RGB mode.

Initially I tired using the same techniques as last time but as you can see from the original camera image below there is really only varying tones of lime colors and the copy/paste and fade to screen or multiply didn’t give me the right separation for a mask.


Another Method to find a Mask

It hadn’t occurred to me before and maybe some of you are already using this method, but in camera RAW with the temp adjustment and the curves and B&W adjustment I should be able to create a good mask. A Photoshop layer can also be created with the adjustment layers but I find the color temp along with the 2 extra colours available in the RAW adjustments that this is better than a Hue/Sat and a B&W layer.


It was easy to create 4 similar but slightly different masks, as I wasn’t sure which would work best for the changes I was going to make.


Top Left
Standard B&W RAW setting
I just set the HSL / Grayscale tab to convert to grayscale’ and a slight yellow increase and then imported the image through ‘the ‘Place’ function in Adobe Bridge.

Top Right
Hue and Sat B&W
I increased the yellow and orange and decreased the green and blue channels.

above image is 1200x800

Bottom Left
In this version I maxed out the orange and red and left the yellow at 70%, the rest remained the same. This mask was for parts that were more pure yellow less green or cool tones.

Bottom Right
H&S Curves B&W
In this version I used the Curves Tab in RAW for radical adjustments to create more of a true mask. The other settings being set as before.

The 2 bottom masks seemed useful and with a slight bit of cleaning up these would work as masks.

The blue leaves and the darker greens were created in LAB on one layer and masked in. On other layers, curves and hues with mask were used to increase warm colours and contrast of these parts.


I often use the ‘Difference’ mode on some layers as image file is being created. You never know what strange beauties will emerge. The blue flower version was created by using several layers and the mask above played with blend mode. I then used a hue-sat adjustment layer on the left image to change the hue of the blue flowers to red flowers.

You may wonder why and sometimes I do also, but I do find a certain charm in their abstractness developed from a photo image.


Niels Henriksen

Monday, January 12, 2009

Winter Fog – Great Photography Weather


I was going to say the ”best” weather but I’m sure that it’s not really the case as there are a few downsides over more perfect weather, especially if you hate the cold and then have to be near cars when there is fog.

Still I think this is an excellent opportunity to take great outdoor photographs.

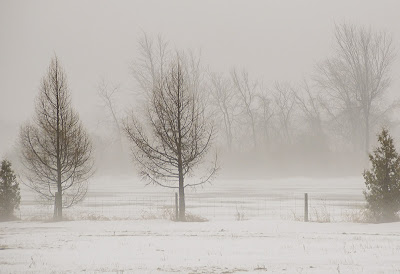
There are 2 photographic styles that winter fog (snow on ground and fog) has the ability to enhance, such as simplify a scene and abstractness.


Simplify

There is much said about our need to simplify our photographic images. To reduce the clutter that takes our focus away from the focal point(s).

In sunnier weather this can be achieved by in-camera or after cropping of extraneous material out of a scene. Using a shallow DOF to blur background when foreground is the interest or evening using contrast to affect elements within the scene.

Fog naturally achieves a lot of this by itself by simplifying the image into those parts that are still visible within the fog. Add winter and especially snow cover and it has become even more simplified in texture.

This is the actual mask created for one of the images and was completed in under 3 minutes.


Abstractness

Abstract image allows the viewer to see an object that is either being lit a certain way to reduce full visual detail or at angle to leave out some detail to make you wonder exactly what you are seeing.

Fog and snow does some of this by removing detail, as clarity quickly diminishes as distance increases or may be lost into the fog.

This time, while out driving, I did stop when there was any inkling of interest in the landscape. I thought a few images would be good candidates for selective contrast adjustments and they were already nearly B&W in colour depth.


Photoshop Enhancements

In this series of images I wanted the majority of focus to be on the trees in the foreground and I used several techniques to enhance these trees, at the same time reducing the clarity of any other elements, in some way, as if the fog had been stronger.

The key element was to darken and increase the contrast of the foreground trees and soften and reduce contrast for objects in the background.

Adobe Photoshop CS3 through the ACR Interface allows you to load both layers into a Photoshop file. One set to enhance the softness of Fog and the second loaded as a smart layer with different ACR settings.

Base Layer
Clarity set to –80

And another layer adjusted to make the tree branches stand out better and loaded as a smart-object.
Clarity set to +80

There just needs a mask created to permit the finer detail of the branch layer to show through and then final curves layer to adjust brightness in some tonal ranges.


Quick and Simple Method to create fine detail Mask

It might seem at first glance that creating a mask for the 3 trees would be a laborious job but there are simple tools to quickly help you make such a mask.

For this type of masking, I usually do the editing directly on the channel layers Tab but for Photoshop Images I also did same using normal Photoshop layers. Either way it will work fine.

For these types of masks with fine detail, it’s always good to zoom into regions of the branch tips where background is to be removed. I carefully watch the branch tips during any of the adjustment processes.

The next set of 6 images shows the progression of changes through the various steps.
Not all masks will need this many steps. The process remains the same until there is good enough separation of mask and then a little cleaning for final mask.

Since I am mainly using Screen mode to further lighten the background, I will adjust the curve of each mask to first compensate for this overall lightness. I apply a curves layer first to set the black point of curve near the left most part of histogram, which also extends the range of blend mode effect.

In the Channel Tab method I would duplicate the best of the RGB channel (contrast separation) and then in this order

Cntrl-M (set curves)
Cntrl-A (select all –channel)
Cntrl-C (Copy all)
Cntrl-V (Paste back into same channel)
Then before anything else, FADE to desired blend mode


For the purpose of this article, I will be using the standard layers in Photoshop to create the mask. The first image was made using the channel method.

Duplicate Blue channel to new layer

Curves layer and set dark point to 0/50

Cntrl-Alt-Sft-E which takes all active layers and makes a new layer on top. This layer will then be set to Screen mode for contrast effect.

For channel method
Copy channel (select All and Copy and then Paste into itself and fade to screen mode.

Then new curves layer and set dark point to 0/28

Cntrl-Alt-Shift-E once more and set to screen mode

I then quickly create a mask for the 3 trees by going around the branch edges and then filling the rest of the trees. In the Channel Tab mode I just erased the lighter background material. This mask may be used later and that is why I created it.

Use mask to duplicate layer and set to Multiply mode to darken the trees

Then a final curve Cntrl-M with low point set to 0/120 to really darken the mask and we have the mask image shown as the second image in this article


It may seem a little convoluted but when you are familiar with the copy-paste and fade to blend mode on channel masks then these become second nature as you play around to see which mode produces the best effect you want.


This close-up section shows how the branch tips are being preserved through the copy and fade actions and the few curves adjustments. (Normal, Blue Channel), the 2 screen blends and then the final with the multiply layer and mask.

In the above image you can just make out the outline of a house on the right side of the image.


Another Fog image this time with a singular tree in foreground and the soft tree shapes in the backgound

Niels Henriksen

For a fellow blogger who has done horses in the past I included a workhorse playing around in the fields further down the road.


Sunday, January 4, 2009

Creativity Ideas

A milestone such as anniversary dates (Blog launch) or calendar dates (New Year) provides a good opportunity to reflect on your goals, artistic directions, how well you are on your path and most importantly a time of celebration. I like the last part best, as I think it is very important to celebrate any success that you have achieved and not necessarily at the opinion of others who may not always understand your creative ideas.

With a New Year beginning I thought I would reflect a little and at the same time suggest some ideas that might spur new photographic opportunities.

There are many words, maybe too many, written about creativity, about being creative and the freeing of the inner spirit as if there were some scientific formulae that we could all apply. Unfortunately that is not the case.

The one main thing that I do believe is that creativity is opposite to the task of living, at least for most of us. What I mean is that the everyday, logically, right-brain side, task oriented, approach to our lives does not generally allow us to be creative. There are many people whose daily job is all about creativity, but I would imagine that even these people have deadlines and pressures and therefore use a kit of tools to kick-start the imagination. The key piece they have is that they regularly practice a variety of techniques to stay on the imaginative region.

It is only when our mind is free; to wander, to explore, to not accept the status quo on what is ‘good art’ that we may find creative thoughts and with some skill and persistence create artistic works.

I do have one measure that lets me know when the force creativity is strong. It doesn’t mean I am creating great or even good works but there is a chance. This is when I am oblivious to most of life around me. I enjoy so much what I am doing that time doesn’t matter.

With this article I selected an image I enjoyed from each of the last twelve months starting with November. I thought that last December’s images were too fresh to reshow so soon. Showing images is the celebrating part. In the last year I posted 320 of my images.

In-line with the theme ‘twelve’ I thought I would also suggest 12 new ideas that might help you peruse creative routes. There is another 12 related idea and I will explain this latter. If nothing else, I hope that the best part is that there are a couple of ideas that get you smiling about images you are taking.

I would be pleased to hear your ideas or suggestions or any other thoughts on this subject.


Stop for 21 days

I need to get this drastic method out first, which includes all photographic related events therefore, no shooting, editing, or related photographic readings. Sometimes you need a holiday from yourself especially if you are working too hard at it. Or feeling frustrated about your progress or current state of mind.

As with any recipe, season for your own taste and pick any number of days you like and adjust to your own needs, but make it long enough that you are longing to try new avenues of exploration.


Quick Sketch

Take a small note pad and sketch, with a few lines as possible, a subject in front of you. It doesn’t have to be accurate or good or anything special. Just the practice of reducing scenes into simple lines, shapes and patterns will help you to better see compositions when looking through the view finder


Hang around wild ones

We do tend to enjoy the company of like-minded people with similar interests. But if you could go out shooting with someone who is completely different from your approach, this cannot help but be a learning experience. It might feel a bit painful if too radical but it should open up your vision to new ways of thinking.

This could include three year olds as this Christmas my granddaughter was allowed to use point and shoot camera. There was a special awe in the moment as I watched her look through the tiny viewfinder and the flash continuously firing away as she moved around the room. I thought I should try that sometime.

Wait an Hour before Photo Swimming

When getting to a place to begin your image taking, sit and wait an hour. Take in the whole scene; understand how time and people or things move through this space. Think about how you relate and how your images can explain this place or subject. Then go in the deep end, at least figuratively.

Words a Day

I was talking to a close friend the other day about creative ways that she could once again write more. One of the ideas discussed was to write a small number of words a day (I love easy to complete learning tools) with whatever struck her fancy.

The next day I thought that this would be interesting for me. A method to distil little things into a few words is another way of seeing with words. In line with this theme I am now writing twelve (12) words a day mostly about objects around me. I may have several such per day, but at a minimum there will be one a day. Doesn’t have to be good, just the process describing is enough. It’s only been a few days now but on 2 occasions after completing the test I later got up to actually take a picture of the object.

For those who would like to see how good or bad my words are I have created a blog to capture some of these words. Of course it is calledTwelve words a Day”.

Let Others give you 12 image Photo Theme

Ask someone who might understand your passion about photography and ask them to give you a theme or subject for you to shoot twelve images (there’s that 12 again). This could be family members, friends or fellow photographers or even another type of artist.

While there is not a need to present your collection, it would aid your creative process to either discuss results with the person who suggested or even post images and observations to a blog.

To any who might wish, I would be happy to give you a theme as long as I can see some of your current images.

A Project
Start a project to explore and document a passion you have about elements of our life whether it be new trends, your favourite pursuit or hobby or entities that are to be lost to time except as recorded by photographers.

This may be a little more daunting or demanding while the work is on going but when completed there is a unique satisfaction with your body of work. A project allows you to explore a theme over a longer period of time and in so doing your own ideas and visions may be re-focuses as time progresses.

Last year I participated in SoFoBoMo (Solo Foto Book Month) project.

I definitely found this challenging and not only did I have 32 photos ready, I also had to learn and publish a book with the results within a one-month time frame. A little stressful but great fun once completed.

Lesson leaned:

I went completely artistic with layout, but this lead to a problem that not all mass-market (less costly) book publishers could handle the photo layout. This year I will choose a standard template so I can have the book printed without high-end cost of a completely custom layout.

This year it will be starting up again and please check SoFoBoMo status update from the blog Mussing on Photography by Paul Butzi

Photo a Day

A standard practice with many photographers and bloggers. But don’t fret if you miss a day or two or that no images are the finest artistic quality. This should be fun and not a chore and should help you to better see compositional images in the everyday objects and life around you.

Go on a Photowalk

Check Facebook or other social media tools for online clubs or even join a motor and brick club and see which photowalks are planned. There are even professional photographers who organize and charge for their photowalks. Not a bad investment.

Why not organize your own photowalk. Choose a location, time and route. Have people meet at a convenient place for a starting point and do suggest a location like a coffee shop to meet afterwards for some good camaraderie. Do have an alternate date or place in case of bad weather

Take a Bus

Hop on local bus, subway, train or bicycle and decide to get on and off on many of the stops and take images of the street/landscapes or objects around you.

GPS your spot

Pick an area on a map that you can assign GPS coordinates and establish a grid range that is feasible to shoot within. Randomly pick out the longitude and latitude coordinates and go and shoot whatever you find. Do give yourself some flexibility in case the coordinate is deep inside concrete.

Even use a map on a dartboard and who knows where you will wind up.


Progression Series

For a period of time, either take new images or review works completed and see what can be learned about yourself. This could apply to many ideas above especially the photo-a-day. The one key is to wait about 6 months or more so that your judgement will not be too biased with recent mental images.

Summary

There is no need to share this work with others because once you begin, you start to judge your work and that’s not the intent of exploring creative approaches. It should be just for the pure fun of seeing what happens with no rules or constraints on what’s acceptable.

Keep the guidelines simple or adapt as you go along so that there is no failure to complete.


Niels Henriksen


Related Articles


10 Best Methods to take Great Photographs

Are you Creative enough?

Creativity – What else do you Do?


Like

Related Posts with Thumbnails