Pages

Monday, April 27, 2009

Use ACR Clarity to create shallow DOF


With a few of my previous images I have used the Adobe Camera RAW (ACR) “Clarity” settings to improve the focus (clarity) of the subject and in corollary reduce the detail in the background, which is very similar to using a higher F-stop or shallow DOF.


When experimenting with digital editing techniques, sometimes you realize that you have a new tool of choice that is better than some other method you are using. But with all good things there are limitations and images that are better suited for this technique.

Occasionally, I did use Photoshop blur filter, normally with small settings but I was not fond of the overall effect it created when larger settings (above 10) were used. It is a bit hard to describe but it seems too unnatural even when adding some noise back in.

To demonstrate the effects that can be achieved, I select 2 images to compare using just the blur tool and the blur tool with clarity set at full reduction of –100.

Using the clarity tool is not a one-button-solution as you will need to use layers and a mask to separate the subject from the blurred background. To really see the comparison, click on any of the thumbnail images below, as the originals are 2400 pixels wide.

Normal Clarity set to - 100 Blur only 16 Blur at 16 on clarity layer

Just using the maximum clarity setting has softened the background by removing contrast, which has the effect of leveling or washing out the colours and tones. Better, but still too much detail that is competing for attention with the colours and details of the bird.

The 3rd pane is just using gaussian blur at a setting of 16. Details softened but the contrast in green tones still competes with the bird.

In the 4th pane, I used the same blur setting (16) but applied this to the layer that was set to minimum clarity (-100), which is the best of both effects. Background softened and no highlights jumping out.


Normal Blur only 16 Blur 16 on clarity layer

I used the same settings as the first image but omitted just showing the clarity layer only.

Normal Blur only 16 Blur 16 on clarity layer

With very fine detail not much improvement between versions

When using the clarity setting with or without the blur effect, you may need to adjust the colour saturation, with whole or individual colours, to fine tune to your taste. Certain areas that are now washed out may need to be increased in saturation or lightened or darkened to better match the focal area.

It’s not a perfect or do-all tool but it is something to further help with increasing clarity of subject. It works great in fog scenes such as in this article Winter Fog – Great Photography Weather , and when I used it to soften background with the portrait of the curly-haired kid In the Creativity Article and Candid Portraits .

I will be heading to Demark for almost a couple of weeks this coming weekend as one of my brothers is getting married in the Danish Queens church which is inside the castle.


This is where Crown Prince Frederik and his wife Mary live. Queen Margrethe II will be staying at the castle during this period with her guards.


My brother, whom had been given a medal by the Queen a few years ago for distinguished service, asked permission from the Queen to marry in her private church (Fredricksberg Slotkirke), which she granted.

There is no photography allowed inside the church.

This trip will change my SoFoBoMo plans as I will not be able to do the original theme but now, I might pursue a theme of Copenhagen Bicycles.

Other images
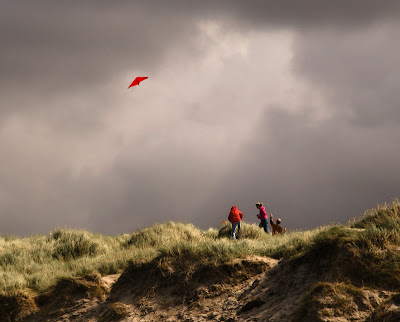

This was taken on the west coast of Denmark and while the sky was heavily overcast there were shafts of light shining through. Since it was taken with a telephoto lens, the kite was not visible within this tight frame, therefore added from another image.


Thanks to all those who have joined this blog lately and a special thanks to those who still come by on a regular basis.

When the readership finally reaches 1,000 members, highest so far has been 885, I will give away 2 singed prints to those readers (random selection) that indicate an interest.

So please continue reading the articles for a little while longer as I am hoping by late summer or early fall to reach that threshold. I don’t actively try to get more members but through our community, it seems to be slowly increasing.

It will most likely be 3-4 weeks before I am able to post again.

Golden Fields of Summer


Lately, I have been busy trying to improve my oil painting skills and I feel I am now starting to see some improvement. I did this image from a photograph. Not mine but a book that is meant for you to practice. I used my own creativity to enhance the glow in the fields by changing from summer yellow to an orange to enhance vibrancy. Also, I changed the gray parts of clouds to purple-red to show reflections from those glowing fields. I


Niels Henriksen

Tuesday, April 7, 2009

Photographing Black Objects


We were visiting the Vemork Hydroelectric Plant in Rukan, Norway which is now a museum. This is the site were the allies in WWI tried to destroy because the Germans were producing heavy water during the war.


In a previous article, Your Body of Work or Life Long Project , I discussed the train that was sunk on the ferry carrying the heavy water back to Germany. See link

Off camera flash. Blue colour added as a layer in Photoshop and set to color mode and the copper items masked-out Blue and orange are complimentary colours and I wanted to create contrast and conflict with this image. There are lovely tones and shapes in the blue areas and the 2 copper items disrupt these patterns and almost don’t seem to fit.

I wasn’t sure what to expect from the hydro plant tour but I thought we would see more of the inner workings of the whole plant, maybe down the water tubes and other good tunnels and underground workings. This was not the case as we first saw a 12 hour film (British movie about the mission to destroy the plant) and then a tour guide explaining about the processes and equipment for electricity generation.

Being an electrical engineer I did not need a repeat of previous general course material and went off to film the generators in the other half of the large singular room. The photo below shows the area I was exploring while others were listening to the museum guide.


The room has very many windows facing the cliff side, which was now in the shade and therefore, no direct light striking any surfaces and thereby creating very large dynamic range from pure black to white, which would make it even harder to show any details in the image.

I only had about a half hour to shoot before the gang moved on. For these types of scenes that are new, complex to shoot and contains a lot of detail, I would have liked to spend at least an hour to walk around and visually inspect all the nuts, bolts and other doodads before planning what to shoot. I think there could have been a nice theme developed if I had the time as opposed to shooting a bunch of what may be interesting views but no connection.

Shooting black objects, unless it is documentary in style, will tend to focus on the abstract in design. There is not much colour available and at best you are probably only going to capture any reflected colours in the objects.


Off-camera flash set on the ground and to my right. The light from window was not striking this area and I wanted more contrast in objects and lines.

I decided to use my SB-800 off-camera and wirelessly triggered in the hope that these extra reflections on the shinny black generators would give more interest.


I would lay my flash all over the place on any other piece of equipment to see what kind of effects this would give.

One thing I did notice is that when the flash was behind me, there was not always enough reflected trigger flash from the camera to overpower the ambient light and the flash would not fire.


Photographing black objects is not much different than photographing any other object but there are a few hints that will make every shot more likely to be successful.


Correct Exposure

First, your camera, whether shooting RAW or Jpeg, will want to make everything mid grey. This means that if your image is mostly black with no specular highlights, it will turn the black object a nice mid grey. This is less of a problem with digital cameras as it is easier with digital editing to lower tones as this doesn’t introduce noise as opposed to white objects when you have to increase tones.


The downside, if not corrected, is that some of the information is lost when clipping occurs.

Camera RAW is very forgiving and in many situations any exposure and colour temperature corrections can be adjusted later.


Do check the histogram if you can. If the subject is shinny then it is ok to have some of the highlights clipped if these are only the edge or point reflections from light source.

Normally reducing by 1 ½ (-1.5ev) to 2 (-2.0 ev) stops should cover most situations.


Colour Temperature


Is the black object you are capturing really black? Black is not really a colour but the absence of colour. This can be achieved by no or little light coming from a coloured object or it could be painted black. I know from my oil painting experience when I lighten what are labelled as black paints with white I get nice blue, greens and browns.

If there is no reasonable areas of reflected light source, your camera may interpret some of the lighter black tones with a colour cast due to the true black colour.

This image has 2 light sources, Bounce flash on the left, which gives natural tones to rust and the blue sky light from the right which adds blue highlights to those edges.


Artistic Merit


For a lot of black items, the focal point will be the abstract lines created by the sources of light striking the object.


Taking images of mechanical or even architectural features may be great if that is your passion but for many others it can be boring if they are not connected in a theme or story. These individual images, since they are not ravaged by time, do not tell a story in themselves but only by connecting them together is a story told.


The direction of bare rock outcropping and shadows help to re-enforce the downward direction of the cascading water. By having the trees block some the bottom of the water we are not completely drawn out of the scene.

What is not apparent from this image is that the waterfall is less than half of the canyon wall. These canyons are very deep.

The power plant is situated half way up the canyon walls and this image captures some of the houses on the other side of the valley that are built precariously (at least for those venturing out late on a dark night) on nooks and outcroppings along steep cliffs.

Niels Henriksen

Like

Related Posts with Thumbnails