Pages

Wednesday, August 26, 2009

Painterly Effect with Photo Enhancement Techniques

While deciding on an image to work on and achieve something special, I remembered a scene while in Copenhagen this spring. It was early morning and there was this lovely textured stucco wall in the dappled light with bicycles, benches and an old oak tree (at least some majestic type).

In reviewing file archives, I found that I had only taken 4 images in the entrance square to the Frederiksberg castle grounds in Copenhagen. Of the 4, there was only one that caught my eye. I now wish I had spent at least a couple of hours, if not all day, here to watch how the sun changes the light in the courtyard and how reflected light modifies the local colours.

The scene is interesting enough with good texture and detail but I wanted something more atmospheric of this place.
The approach I took was to deviate from a photograph look and experiment with more layers made up of pieces of the original image. I wasn’t sure where, exactly, I was going with the outcome but it was fun just to watch as I adjusted the modes of the new layers.

The image below is the version that I like best in trying to achieve a glowing watercolour rendition. A light cream-coloured, watercolor textured paper would even soften some of the lines a bit more.

Click to see 1024 pixel image

In working with Photoshop or other pixel-editing tools you have key choices of color, contrast and edges. The effect I was after was to soften the image and add some glow while for some essential edges, enhance contrast to give extra texture and definition.

Duplicating the base layer, increasing its size by 25 pixels on each edge and then doing a gaussian blur of 5 pixels would achieve the glowing effect (faux Orton effect). The final effect accomplished by setting the blurred adjustment layer was set to overlay mode and add a curves adjustment layer, attached directly, to fine-tune contrast adjustments within the image. Then opacity to taste.

I wanted various ranges of detail texture so, to achieve this I duplicated the base layer 3 times. Each of these 3 layers received a different gaussian amount of 5, 10 and 25. I then ran the Photoshop pencil effect on each of the different blurred images. As you blur more then fine lines start to disappear and others become stronger. This would give me possible overlays or masks from fine to strong detail to hand-tune different parts with detail.

With each of the 3 edge contrast layers I would step through the adjustments from Darken to Hue adjustment and observe the effects. If there was a section that interested me, I would mask it in and move on to the next layer and once again step through the various modes.


In the above photo image I like the pairing on the contrasting analogous colours (the orange wall, red hydrant and violet bike) being complimentary of the green foliage colours and the cool shadows and it’s these contrasts that I tried to magnify in the first enhanced version.

I now realize that there are so many more images from different angles and lighting, but it’s now so far away.


The 6 images below show the experimentations and progress towards the final version.


Do click image for a full size image or 1600 x pixels for the various versions I went through.

The changes affect the green leaves, window detail and detail and colour of shadows on sidewalk.
The final image (first in this article) is made using the bottom right image on colour mode to the middle image top row.

Maybe you like one of these better.


Niels Henriksen

Monday, August 10, 2009

Need a Live Model – Use Yourself

Special Note to Readers:
A thousand plus thanks to all the subscribers and any other reader of this photography blog. The other day Feedburner showed a max count of 1,004 subscribers at least for one day. As I mentioned previously I will be giving away 2 signed prints by random selection. This will happen during the month of September as I am waiting until then to ensure that all readers have a chance incase they are on holidays.


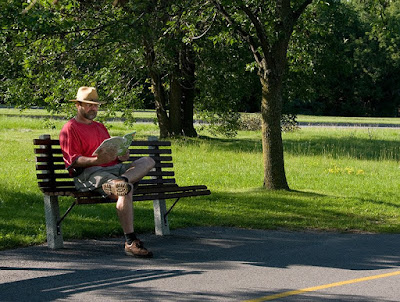
I have never used a live model. Even when our camera club provides sessions with models and studio lighting, I still don’t venture in that direction. I am not sure why but I can only guess that since I don’t do any commercial or for-hire work then there is not a real need for this type of staged event. It’s not that I mind studio work as I have setup flower shots, etc, but these are for artistic value and not stock photography. Maybe if I had an artistic idea that used people then I definitely would pursue it.

This was the case for some staged model shots and not wanting to bother using a friend or hiring someone, I decided to use myself in a setting. I hope its not like the lawyer thing were you have a fool for a client.

The outcome was not to have a great shot of myself but to have a reference image that I could use for oil paint as part of my learning process. I seem to be somewhat ok with landscapes but scenes with people really needs improvement.

The Process

I placed my camera on a tripod and pre-focused on the leading edge of the bottom edge of bench (to match plane of eyes) and then switched off autofocus. I set the aperture at f 10.0 for extra insurance for clear depth of focus and positioned the bench in the field of view for artistic merit.

The camera was then set (interval mode) to automatically take 10 images with duration of 10 sec between each shot. Then walk or run to the bench and pretend to look cool or some other silly pose.


What I learned

For static poses in a city type environment, a set of 10 with 10 sec between shots seems about right as random things do happen around you as the above image shows. Sometimes for the good but most times not that interesting.

If it were a dynamic scene, such as shooting hoops or jumping around, then I might try durations from 0.3 to 1 sec and a sequence of 30-40 images per session. Thank goodness for digital camera since development cost is only click and view.

Towards the end of this play time I noticed that the white pages of the book were reflecting brightly when angled a certain way and I used this to light the shadows of the face as in the first image.

Notice the comparison change in luminosity of red shirt and face by using book reflection in images below.

There is no reason that you could not also use a real reflector mounted on a stand for better light control.


The next few image shows a bunch of out-takes showing me running to bench, other people in scene, adjusting my hat and cars behind and a runner which works better in the second image in this article.


The image below is the early morning view from the bench looking across the Ottawa River. A nice spot even without a camera to just sit and think.


So if you are a novice like me with using live models then this method might work to get you some familiarity with posing, lighting and other techniques. Give it a try and share your experiences with the rest of us.

A few more images from around the bench with and without people.


Niels Henriksen

Saturday, August 1, 2009

Morning Ground Fog

One of my favourite shooting conditions is foggy weather. Winter being especially nice with its white bleakness and it’s ability to isolate and create soulful subjects. An article on Winter Fog – Great Photography Weather

Living in a mixed hardwood and evergreen forest geography and not near the ocean, these infrequent foggy mornings become like a special filter that can remove close by clutter. Clutter being all the other green stuff that is not part of your main focus.

We often use DOF to accomplish this effect, but a natural wide-open lens is even better.

The 3 images shown below are from photographs taken about an hour after sunrise when there was still ground fog from the cool humid night.

The photographs are all taken from a small area of about 100 ft by 100ft in the fields behind my house and I probably only differed about 50 ft between all shots.

In ACR set clarity to 80% to increase contrast in fog contrast. Added new layer from ACR and set luminance and saturation higher for yellow and opposite for green and added a slight contrast curve. Set this new layer to colour burn at 25%. Added curve layer to increase contrast. Then added solid yellow ochre colour and set this to hue to soften the colour effects from the other 2 changes.


By using the coloured layers as overlays in Photoshop and channel mixer adjustments in ACR RAW subtle colour effects can be achieved.

The one thought that came into my mind while writing this article was that, I need to map out and visit other areas when these sparse gifts arrive. Field grass fog is a special type as it hangs a few feet above the tall grasses and then only rises I would guess from 5 to 20 feet in height.

In ACR set clarity to 64, vibrance to 46. Increase sat for orange and reduce for green for more golden glow. Reduce luminance for green to –75 to darken core of evergreens.
I copied the background layer twice. One set to overlay at 25% and the 2nd to multiply at 20%.


Because of the shallow depth of the fog and its wispiness, the sun can more easily penetrate and with the aid of the taller tree tops not in fog create striking rays of sunbeams.

The effects I wanted to achieve were to be able to tone the sunbeams and shadows differently. In Photoshop the blend-if sliders perform this function by being able to set both the knee (start transition) and slope (trail-off in effect of change). The last part is very important as like any masked type effect, sharp transitions create disconnected edges. That is why most masks have the edges slightly blurred to overcome any edge focus softness from the camera.

In the above image I used several layered tones, to warm sunlit areas and cool shadows without the use of masks except for the post, which was easy to isolate. The use Blend-if sliders with a gradient drop-off accomplishes this perfectly. It is best shown in the image below.


All the effects are meant to be subtle. Just to lightly influence our perception of the moment captured by the camera.


It has been now confirmed that July in Ottawa was the wettest in recorded history. Which means it rained all the time but it has almost always been with heavy clouds. Because of this, I have been able to enjoy one of my favourite summer pastimes. This is sitting in a comfortable outdoor chair, reading a book, while listening to the rain gently fall on the awning top.

Niels Henriksen

Like

Related Posts with Thumbnails