That little 8GB trek, which was more like a meander of 3km (2 mi) along the shoreline of Nykobing Mors, was a very enjoyable method to exploring the beaches and forest areas.
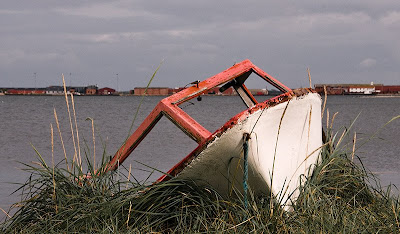 Sharpening and colour enhancement to red part of boat and a little de-sat and darkening of grass.
 Sharpening and colour enhancement to red part of boat and a little de-sat and darkening of grass.
Setting a goal for the number of images I wanted to take and for this photo walk, which was almost 500 photos, wound up giving me more ‘sense of freedom’ in my approach to photography.
 B&W adjustment layer for tones and then a base copy on top set to color mode
 It didn’t start out that way. I was on a family holiday and every now and then I needed to be out by myself, seeing what I could discover and create ‘anew’ with the camera.
 Background masked with B&W adjustment layer. Curves applied only to this part to lighten lighter parts of background. New layer set to color mode with a light brown fill and masked for background. Some darkening and highlighting applied on background.
It wasn’t until I had taken a few images that I realized it was now somewhat easier to take photos and I was having a little more fun. Usually, when I am out taking photos I am trying to find that great shot. If something seems interesting I
 New RAW layer added as smart object and boat colours adjusted on the luminance and saturation sliders and then masked in.
 I found that by setting a ridiculous, at least for me, high number of images to be taken, that there were some benefits that were obtained.
- More relaxed approach to taking photos.
- More depth in exploring the locale. Knowing you need a lot of images you tend to look in more corners and alleyways, etc.
- It breaks some of your old habits or routines, as there just isn’t the time or energy to tackle the subject matter in the tried and true methods you normally use.
- Changes your approach to creativity as you need to analyze less and just shoot what catches your eye or emotion.
This is not guaranteed to make big changes in your style but it may open up new approaches you hadn’t as yet tried. Also depending on your own style you may already be using this method.
I do find that it is fun to try new techniques or styles with my camera. They are not always completely successful, but I do learn from them and there are always, even if just 1 or 2 that I am pleased with.
 New RAW layer added as smart object and boat colour adjusted reduce brightness and increase sat
The landscape did lend itself to taking panoramic images and that sure also helps with the shear quantity I need. I always seem to find something magical about large panoramic landscape images. There is a sense that you almost walk into them. That lovely rich detail that encompasses your vision.
I will show some of these in next weeks article.
 One RAW layer to keep water slightly blue and increase brightness of spit. Another raw layer added to increase contrast of the sky and make neutral in color.
Niels Henriksen
To see part I of article My 8GB Walk-about


4 comments:
I took 3500 photos on one recent weekend at the beach. So I understand this approach. Also, it's not necessary to set a goal if you have few techniques that "get in the way". I especially enjoyed this post because of the notes regarding photo editing you left under each photo. I didn't even KNOW you could sharpen just a part of a photo. That's so cool. Does Adobe elements have that capacity??
David:
Wow that is some serious shooting over a weekend.
I am not familiar with adobe elements so if I can guess correctly you should be able to selective sharpen with one of two methods as long as you can add a layer or copy of base image in a stack of layers.
Then sharpen the image for the effect you want for that particular section and either erase parts of layer you don’t want sharpened or use a mask to hide these parts. You can then sharpen other parts of a new layer for a different areas nd perform the same hiding technique.
Add the end merge the layers back into a jpeg file.
Other you can use GMIP which does handle layers and is free.
Niels Henriksen
Oh I see. I should have thought about layers. I'm just learning about them with a tutorial on YouTube. I believe he says that you can use the masking technique with Adobe Elements with a little slight of hand.
So I will try that once I have mastered the basic layering procedures.
Another in your series of most outstanding posts. You have described beautifully your process for freeing yourself from the tyranny of analysis. Then, we get a marvelous bonus with the invaluable notes on processing individual shots. All the photos are all wonderfully realized and your notes put me in the mood for processsing some images that have been languishing in files. Thanks for all the time and care you put into these posts. You are going to have an audience clamoring for tutorials.
Post a Comment