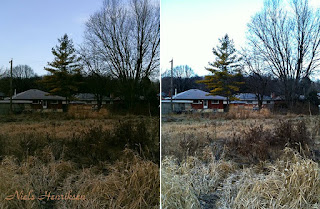
The new 3G iPhone is one good camera to have integrated with your cell phone. The main feature for HDR is the ability to select different areas of the scene and at the same time bracket your exposure. Then with Photoshop or other similar photo-editing apps, combine these multiple exposures into an HDR photo.
Its often been said by many photographers that the best camera is the one you have with you and for many of us this means a simple built in camera with our cell phone. Only simple if compared to many full-featured cameras today but if you just look back some 20 to 30 years, these camera phones are just amazing.
The iPhone automatically adjusts its exposure setting for the area selected within the focus box. By tapping different parts of the image, it changes its focus and it also adjusts the exposure compensation for selected area. Select a dark area to lighten and a bright area to darken. Try and select uniform tonal areas and watch how image adjusts.
Without a tripod or other solid support getting multiple exposures of your image with the iPhone, that overlap perfectly, is not an easy task. There are some tips that can help you achieve better results:
Try to lean yourself or arm against a solid stationary object. If not possible, lean or squat so your elbow can rest on your leg or another part of your body.
Once you have your scene selected examine the 4 corners carefully as these memories will be the markers for ensuring that the next image is reasonably aligned. With practice you can get quite close. One problem if they are too far off is the final image area decreases to only the overlapping parts.
For complex scenes like the frozen pond above, take many images by selecting different areas of the image for focus. This will ensure wider coverage and sometimes all you need is a small area to add in and alignment is easier for smaller parts.

In Photoshop, I use the difference setting in layers mode to align the images. Once I get the area of the image I will be using reasonably aligned I use either the Transform or Warp functions to fine-tune specific problem areas.

Don’t spend too long on aligning the 4 corners, as it’s easier to just copy layer and align the new area that you wish to use. Normally the change in angle distortion between images is only notable over the entire image. Small sections work fine.
I find that with the iPhone’s wide angle, that any small movement creates bigger distortions at the edges of the image.
It’s not a prefect tool but when the camera phone becomes the best camera you have then with multiple exposures you can get good photos in high contrast settings.
First Snow Fall of the Season
The other day we just received our first snowfall and nice 2” or 5 cm of the fluffy stuff.
As I was heading out for my morning walk, the sun now stays at a low angle a lot longer and the fresh tracks in the snow were being side-lit on the inside edges which gave them a luminous glow.
It’s interesting to watch the tracks that we leave. Each track, whether they’re from boots or bikes, are different.
Strange how great it seemed that day because 2 days later we had 10” or 25cm of snow. A lot harder for a walk-about.
Niels Henriksen


2 comments:
Wow! HDR with an iPhone!! Who knew?? :) I'm still clinging onto my 1st gen iPhone... but once I finally move on, I'll be sure to try this. Thanks for the great post!
Happy New Year from Austria!
Post a Comment